Wednesday, March 31, 2010

Embroidery FAQ Part 2

Silk on porcelain
The most asked question I get is, "How do you get the drawing on the bowl?"  So I decided to document the making of piece from start to finish. Here is Part 1.
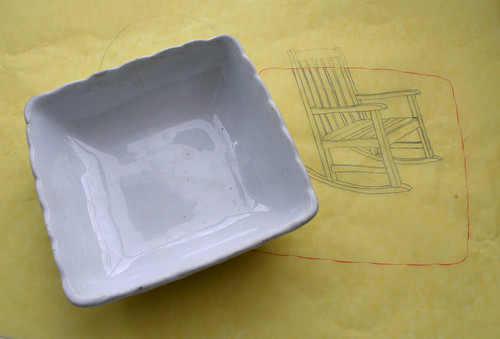
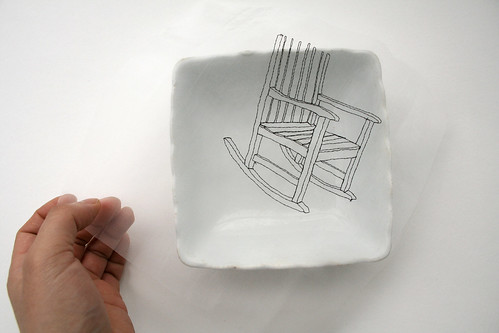
After I finished with the embroidery I play around a bit with the composition.  

Rocking Chairs
Here are a few examples of what I could have done.  It's amazing what a tiny shift can do to change how the piece is interpreted.  Seeing these photoshopped together I have an urge to do a series of based on chairs!


Gluing
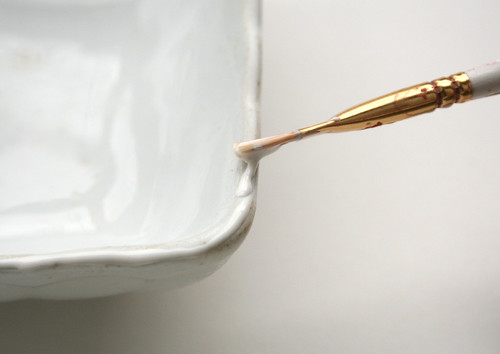
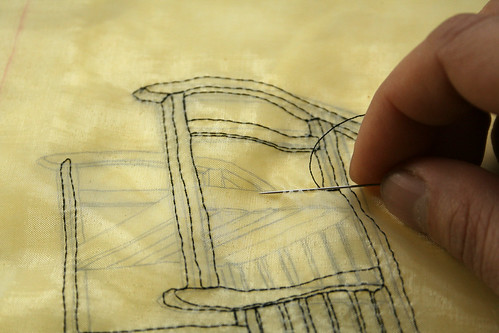
When I've decided on the final composition I sand and apply a thin line of glue to the bowl's rim.  Then I gently place the silk on the bowl.  This part requires a lot of precision because you can only do it once.  I can probably wash the glue off before it dries and redo this step, but the fabric might warp from the moisture or I risk damaging the embroidery in the washing process.  I use a PH neutral PVA glue, it's used in a lot of bookbinding applications.  It's archival, dries flexible, won't yellow or crack and has great adhesion properties.  I've used this glue since 2005(?)... and my first few pieces still look the same, no apparent aging/yellowing or cracking. 

I've read up on a few discussions on how all PVA glue (white glue AKA Elmer's Glue) are the same.  I assure you they are not!  There are definitely professional grade glues that are safe for your work and others that are cheapo's.  PVA glue is probably the least toxic as opposed to epoxies.

more gluing
I brush on an additional layer of glue to the silk surface, this insures even coverage.  I let the glue dry for a few hours and trim the excess.  And that's all folks!

My Mother's Mother
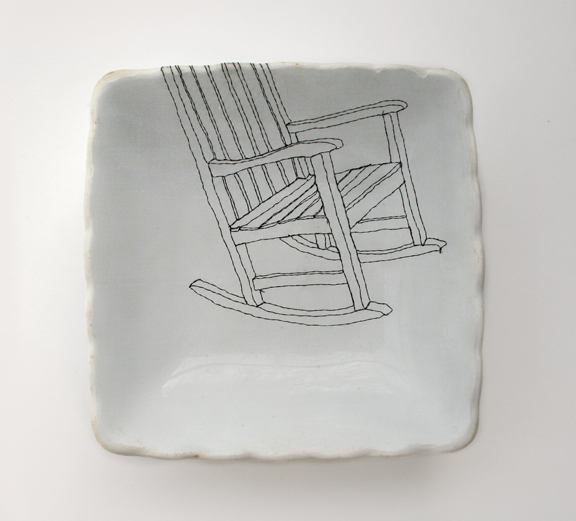
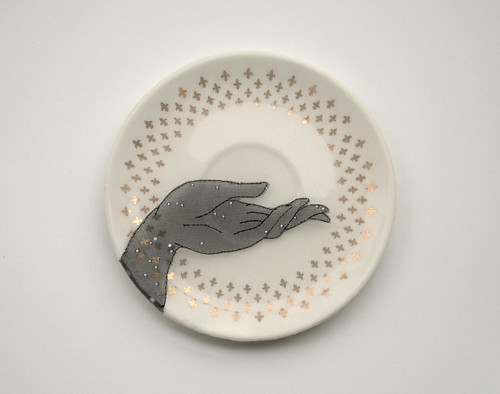
This is the finished piece.

Friday, March 26, 2010

3000 Yards And Counting!

3000 Yards and Counting!
I haven't kept track of how many pieces I've made, but I do keep track of how many spools of thread I go through.  I'm almost done with a 3000 yard cone of thread!  I started with this cone in 2007... I've since switched to Gütermann's polyester threads for my main embroidery and reserve the big cone for the "hair" in my work.  I'm very happy with the quality of their threads.  It doesn't fuzz or fray even when I undo the stitching several times to rework my lines.  It's also just thick enough for my purposes... I get really nice clean lines out of it.  I've gone through 2 of the Gütermann 250 meter spools within the last year, so I guess it's 3500 yards and counting! 

Thursday, March 25, 2010

Embroidery FAQ Part 1

The plate
The most asked question I get is, "How do you get the drawing on the bowl?"  So I decided to document the making of piece from start to finish.  This is a current commission I'm working on for Kathie.  The square bowl belonged to her grandmother, who received it from her mother. 

sketch for Kathy
I usually start by sketching on a sheet of drafting velum.  When I'm happy with the sketch I overlap it with the dishware and move it around to select my composition.  Then I mark the boundary of the porcelain by rubbing a crayon along the edge.  This mark tells me where to embroider.

_MG_6005
A piece of silk is pinned to the velum and I embroider on silk.  I like to slip white paper under the velum to help me see what I'm doing.  I don't use a hoop or stretcher, they tug at the fabric too much.  It took a lot of practice stitching to get the right tension so I don't warp the fabric too much.  Although there will always be some amount of wave and puckering, it's all a part of the artwork.  The fabric also tends to "breath", changing as the humidity and temperature changes.  Sometimes there's more slack and other times it's tight as a drum skin.  But most of the time these changes aren't noticeable. 

Stitch work
A close up shot of the stitching.  Most of the linework is done with a simple running stitch.  Because the fabric is so sheer there's no need to double back to create a solid line.  *Doing a running stitch on a solid fabric would look like a dotted line.*  This method of working reminds me a lot of contour line drawing exercises back at school.


Click here for Part 2!

Saturday, March 20, 2010

And The Rest Of The Story...

I finally got around to editing the rest of the Zodiac crayon images.
Zodiac Dragon
Dragon
This Dragon crayon was my first attempt.  Most of the other crayons took at least 2 or 3 trial runs before I was happy with the results.  The texture of the scales turned out very well.  I grew up around a lot of Dragon motifs.  It reminds me of Dragons swirling around a column or post or a Dragon and Phoenix wrapped around a pair of Chinese wedding candles.


Zodiac Dog
Dog
My solution to carving long snout dogs is to have them look down.  Composing within the dimensions of a crayon is challenging.  This fellow is very Kitsune-like.


Zodiac Ox
Ox (see Horse description)

Zodiac Horse
Horse
There's a Chinese saying that ties the horse and the ox together:
牛耕田 马吃谷:  The ox plows the field and the horse eats the grain (and the next line goes)... the father toils for the daughter's prosperity.  The meaning behind that saying is the ox/father works hard and toils away while the horse/daughter gets to enjoy the results of his hard work.

People used to repeat that saying to me all the time when I was little.  They would ask if I wanted to be the ox or the horse.  The underlying question was... do I want to toil and work hard all my life or sit back and enjoy what would be given to me.  I HATED it, even at 5 or 6 years old.  I didn't want to be an ox in the field, but I'd be damned if I sit back and let someone do my work for me.  I was going to be the ox that ate it's own oats or the horse that plowed its own field.  But after my father's death the truth behind this saying really resonated with me.  I worked hard for everything I have in life, but my father did in fact toiled for my sake.  The saying is true.

Big THANKS to Laura for the blogging about my Zodiac crayons and everyone at Boing Boing & Digg for picking it up.

Wednesday, March 10, 2010

From Sketch To Prototype

At the drawing table
A little peek behind the curtains at the making of a plush doll.  I will be sending few dolls to Gallery Hanahou in May.  It's for their Lost At Sea show, curated by Kirsten Rask of Schmancy.

The creation process usually starts with design sketches or doodles.  From there I make a full-sized drawing to get a sense of the proportions. I found the easiest way to make my pattern is to cut directly from the full-sized drawing, adding a 1/4" to 1/2" seam allowance. This is where I make most of my adjustments and corrections, trimming and redrafting each piece/panel to achieve the desired form. The shaping and fitting phase is probably the most frustrating part, I had to walk away and eat a cup of pudding a few times...

Take 2
This is one of the mock-ups along side the original sketch.  This mock-up is made from the 5th or 6th head shape and 2nd body shape I've tried.  I use muslin or thrift store bed sheets as the base fabric for the mock-ups, no sense in wasting good/expensive yardage. 
**however different fabrics behave differently.  Sometimes adjustments in the pattern is needed to accommodate for the final fabric.

Full sized sketch
Full-sized drawing on tissue, I also like using drafting velum for this purpose.

Doll and pattern
The finalized pattern and prototype. There are minor adjustments I'll make from here, but all-in-all the dolls will look like this when I'm done.

Version 3.0
Testing how photogenic she is... as well as playability. :)
I think we'll call her Wabi-chan.  Since she's a prototype, she's quite imperfect... I thought Wabi (Wabi-Sabi) would be fitting.

Saturday, March 6, 2010

Spring!

It's Spring
My favorite time of the year is here... it's getting brighter and warmer.  Little green plants are popping out of the ground and the trees are in full bloom.  It makes me happy.

Mixing in with Bamboo
Clematis armandii
The hardiest vine I've ever seen... this thing withstands drought, freezing temps and thrives in almost any soil. It is a vigorous grower so be ready to prune! This plants lives over my front gate and it's in full bloom right now. I love the subtle fragrance and striking beauty.  It also stays green year round.

over the front gate
In its full glory!

Friday, March 5, 2010

Ceramic Expressions @ Luke & Eloy

Bound
Bound 2010
Porcelain teacup, silk organza & thread
7”h x 7”w x 3/4”d

I have an opening tonight at the Luke & Eloy gallery at Robert Morris University.  Sadly I won't be there but I'll have 10 new pieces in the show.
Participating artists:
Diem Chau, Seattle, WA
Laura Jean McLaughlin, Pittsburgh, PA
Joseph Gower, Sewell, NJ

Gift
Gift 2010
Porcelain plate, silk organza & thread
6”h x 6”w x 1/2”d

Ceramic Expressions @ Luke & Eloy
CERAMIC EXPRESSIONS
Luke & Eloy Gallery @ Robert Morris Universityhttp://farm5.static.flickr.com/4058/4409066565_edc386213d_
5169 Butler Street
Pittsburgh, PA 15201
412.784.1919